
Friday, November 23, 2012
Thanksgiving dress
Thursday, October 25, 2012

Friday, October 19, 2012
Little bird

as Christmas ornaments. Turns out, the answer is probably no.
Thursday, September 13, 2012
Invisibility Cloak

B wanted an invisibility cloak, so while we were in MN we went to Hancock Fabrics and found the perfect solution: silver Liquid Foil. He can see out just perfectly, while the rest of the world can't see a thing. And it feels fantastic: it's slippery and metallic and heavy in a cool way. I cut the yardage into three rectangles, and then just sewed the pieces together with a curved seam at the top. The raw edges definitely needed to be finished, as the fabric starts to run almost immediately.
It's even big enough for Harry, Ron, and Hermione. When they were first-years, anyhow.

Tuesday, September 4, 2012
Princess Gown

Only now do I understand all the time and energy my grandmother put into making clothes for my Barbie. If only she had done it for a girl with a bit more foresight. I can perfectly picture the garage sale thirty years ago, when I sold them all.
Friday, August 31, 2012
Urban [un]Hoodie

Saturday, July 21, 2012
Doll dress
I made this dress as a little birthday gift for one of H's preschool friends. "New Doll" is shown modeling it.
 I used the free Popover Doll Sundress pattern from Oliver & S, and I like how it turned out.

Friday, July 20, 2012
First patchwork

fabric that matched her big picnic blanket.
I've never pieced anything before. I just winged it. Not too hard I
suppose when you use big squares.
Friday, May 11, 2012

Tuesday, April 17, 2012
Wall decor


spinning tops. More than half the fun is folding and decorating them,
which left us with a huge pile of finished ones.
So, we've made them into wall decor. Stuck on with loops of masking
tape. Though they are pretty cool individually, I think they are
spectacular in multiples...
Monday, April 9, 2012
Wardrobe refashion 2

big snag on the front of my cardigan.
So I've added a little patch.
Saturday, April 7, 2012
Wardrobe refashion
I'm starting a ruthless culling of clothes from my closet that I don't
wear. But first, I'm going to see if I can salvage them. I'm pretty thrilled
with the results of my first attempt!
The "before" is this lime green top - I've acquired many of my clothes
by random methods, but this I actually bought new (not a thrift store)
myself (not a gift) many years ago. Not sure why I ever liked the
color.
by random methods, but this I actually bought new (not a thrift store)
myself (not a gift) many years ago. Not sure why I ever liked the
color.

I didn't have any fabric dye lying around, so I thought I'd get
creative. First, I tried watered down acrylic paint. Too late I
realized that my paint was pretty old, so it didn't mix well with
water. I ended up with painty spots on parts of the shirt, and
nothing on the other. Luckily, most of it rinsed out.
creative. First, I tried watered down acrylic paint. Too late I
realized that my paint was pretty old, so it didn't mix well with
water. I ended up with painty spots on parts of the shirt, and
nothing on the other. Luckily, most of it rinsed out.
Then I tried food coloring. Mostly because I have a huge bottle of it
in the kitchen. Turns out, it doesn't stain fabric at all. So, night
one ended in failure. A really messy bathroom and a drippy, paint
stained shirt hanging in the shower.
in the kitchen. Turns out, it doesn't stain fabric at all. So, night
one ended in failure. A really messy bathroom and a drippy, paint
stained shirt hanging in the shower.
Next day I bit the bullet and actually bought a bottle of RIT dye.
Had I known it would cost less than $3, I probably would have started
here first :)
Had I known it would cost less than $3, I probably would have started
here first :)

There are two methods - one which tells you to add salt and one which
tells you to add vinegar depending upon what type of fabric you have.
I had torn out the itchy tag years ago, so just guessed it might be
rayon and added salt. The result:
tells you to add vinegar depending upon what type of fabric you have.
I had torn out the itchy tag years ago, so just guessed it might be
rayon and added salt. The result:

I liked how it turned out so much, I threw another lime green item (I
have no idea why I had two VERY similar tops) in the dye. This still
had the tag on it which said it was silk, so I added vinegar to the
remaining dye (yes it already had salt in it, but I figured it
couldn't matter that much).
have no idea why I had two VERY similar tops) in the dye. This still
had the tag on it which said it was silk, so I added vinegar to the
remaining dye (yes it already had salt in it, but I figured it
couldn't matter that much).
And the result:
I love that they both started out the same color and even though I used the same dye (denim blue) on each, they came out so different. I've already worn them both, so I count it as a success!

Saturday, March 31, 2012
Sweater blanket
Finally finished! Not sure I'd really recommend this project, or if I'm up for doing another. Though I love how it finally turned out, it was one of those projects that was quite frustrating at times. Mainly because I wanted it to look tailored and sleek at the end, and mismatched bits of felted knit fabric apparently don't lend themselves to that look.
But for you brave souls, here's how I made it:
1. Acquire a stash of shrunken felted wool sweaters. Its pretty critical that they are all of similar weights. Cut into strips - I used a rotary cutter and made my strips around 4" wide.
2. Sew your strips short end to short end to make long strips. I used a zigzag stitch and contrasting thread and butted the fabric next to each other (did not overlap). This is not particularly strong, but you'll reinforce later.

3. Arrange your long strips into a pleasing arrangement, then sew the long strips to each other along their long ends also using a zigzag stitch. I sewed them all into groups of three, and then combined the groups of three. This is the VERY fiddly part. One of my strips had much more stretch than the others and ended up pulling the whole thing out of square. I ended up taking that one out in the end.
4. A steam iron is your friend. Once I had sewed all the strips together, I pressed it with a steam iron. It really helped to flatten out the wavy seams and I could pull and stretch it until it was square again.
5. Next, you are going to reinforce your seams with iron-on seam tape. Lay the seam tape along the seams on the wrong side of your blanket and then cover with parchment paper and iron it. It will melt the seam tape onto your seam and strengthen it. Apparently some of these tapes come with a peel-off backing. Mine did not, so I used parchment paper so I didn't iron the seam tape TO my iron...

6. Now add your backing fabric. I used flannel. Lay your fabrics on the floor, wrong sides together. Then pin with safety pins down the center of your strips, not the seams. Use lots of pins. You may want to use your steam iron again to flatten out your blanket - I did (I really wanted mine to be square).
7. Now you're going to quilt it. Which means sew over your seams again with a zigzag stitch, through both layers of fabric. This stitch will also sew through your iron-on seam tape, further strengthening your blanket.

8. Last step is to bind your edges. I had left extra length on my flannel side, so was able to just fold it over and stitch it down. The other method would be to bind with separate strips of fabric. No need to use bias cut fabric, it doesn't need to stretch.

http://www.instructables.com/id/Cashmere-Patchwork-Quilt/
Stashbusting

pinch of catnip. Our cat of course wants nothing to do with them. But
normal cats might...
Tuesday, February 14, 2012

Monday, January 30, 2012
Felted sweater "blanket"
sweaters at the thrift store whenever I find them. I now have 2
shelves worth. Shelves which are desperately needed for other things
in our one-bedroom apartment I might add.
My plan is to make blankets. But, I haven't been excited by the look
of other blankets I've seen - too patchworky, too country cottage.
But I finally found a photo. And was inspired. And spent the weekend
cutting several of the aforementioned sweaters into strips. At which
point, I decided I didn't LOVE the colorway, and wasn't sure I had
enough, and promptly lost interest.
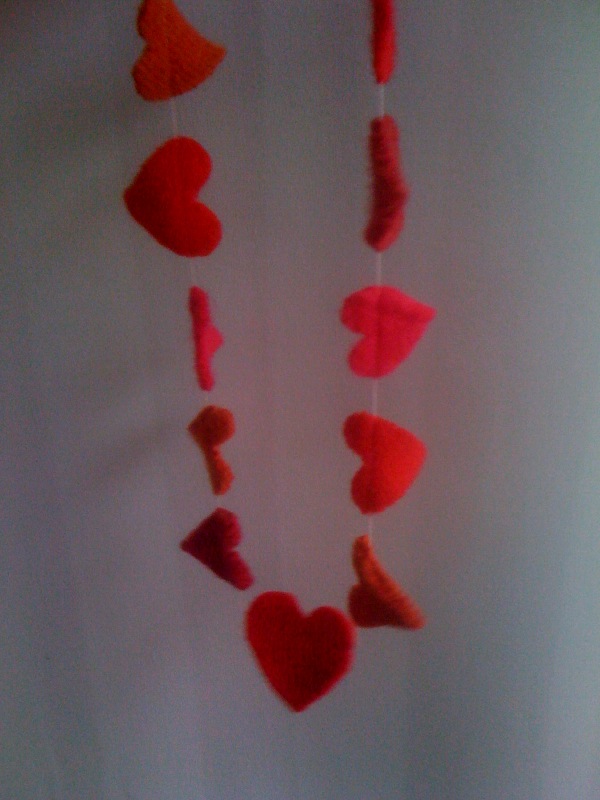
But I did spend some time cutting the remaining scraps into hearts.
And sewed them into garlands. For Valentines Day gifts. Or to sell.
And here they are. Bad lighting and crappy iPhone photo as usual.
Thursday, January 26, 2012

Monday, January 9, 2012
New Pajamas
These were supposed to be for Christmas, but since when do I finish anything on time?
I used the Sleepover pattern from Oliver + S. I love that company! They make me feel so talented.

I used the Sleepover pattern from Oliver + S. I love that company! They make me feel so talented.

Wednesday, January 4, 2012
Knights and Castle

attached to feet so they can stand. And I made their hands with larger
loops so they can hold miniature weaponry (cocktail toothpick swords,
balsa wood shields).
Much of the fun stuff we used to make them (and the Star Wars spaceships) came from the Depot for Creative Reuse in Long Beach. Such an inspiring place to visit if you're into creating things. And the owner Lisa is such a kind, generous person - she really creates community in the East Village.
Frank created castle out of scrap lumber. Stonelike facade carved with
dremel tool. It even has a drawbridge-
May the force be with you.

than the child who received them as a Christmas gift...
Subscribe to:
Posts (Atom)